
Bear Family
We all know teddy bears are made out of snuggles and lovey magic. So how can we make them ourselves? Well, it’s easier than you’d think! These tiny teddies will be adorable wherever they go in your dollhouse—from cooking a bear family dinner, to playing a game, to being tucked in at night. “Sew” easy, so cute!
What do you need?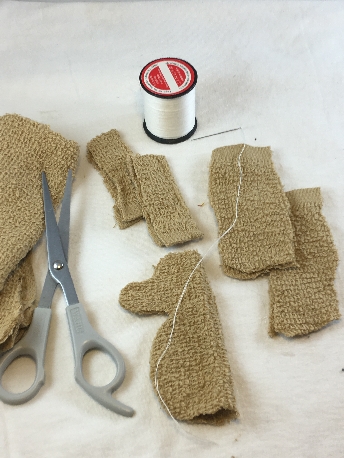
Find your sewing scissors, a needle, black and white thread, and some soft terry cloth. If you don’t have brown terry cloth, any upcycled washcloth will do the trick. Bears of all different colors can be part of your teddy bear family!
The Video!
The Steps!
Step 1: Fold piece of cloth onto itself so you get a mirror image of each piece; each arm and leg uses both parts. Cut arms and legs so the pieces have extra length at the larger ends – this will be folded in to create better shape. Look at the shapes here for reference. Remember, use your imagination, this is your bear family that can look however you choose! Save some fabric for ears later too.
Step 2: Thread your needle with white thread.
Step 3: Knot the end of your thread and start sewing at back of bear’s head.
Step 4: Sew along the edge of the bear’s body. Stop sewing before you reach the end so that there is a small space open --- enough room to fit a couple of your fingers.
Step 5: Turn the body inside out to hide the seam. Poke inside edges with closed scissors, a pencil, or a chopstick --- anything handy. You want to get it completely turned out.
Step 6: Put in some stuffing and sprinkle in some love. Tuck in the last bit of stuffing, fold in the edges, and sew together.
Step 7: Let’s start the legs. We can give the legs and arms a tapered shape by folding some of the existing fabric into the arm or leg at the end that connects to the body. After you have the right amount of muscle for your bear, fold leg fabric lengthwise and sew along the edge. Your stitches will hide under your bear’s fur! Leave one end of leg loose to attach at hip.
Step 8: It’s time to attach the legs. Orient the leg on the body first to see its position. Once you’re happy with position, sew the loose end of leg onto body. Repeat this with both legs.
Step 9: We can shape the arms so they taper at the paw similar to how we shaped legs. Fold the existing fabric into the arm to build up its thickness. Then, sew along the edge of the arm having your stitches hid again under the bear’s fur. Leave one end of arm loose to attach at shoulder.
Step 10: Position the loose end of the arm on the bears shoulder and check for position. Once you’re happy with position, sew the loose end of arm onto the body. Repeat with other arm.
Step 11: Big ears are better to hear you with right? Whoops, that was the wolf not the bear. Let’s cut out pieces for ears; rectangles will do. Fold the rectangle joining both short ends of the rectangle. Position them where you like and sew on ears. It’s getting cuter by the minute, right?
Step 12: Better to smell you with? Using black thread now, sew a little patch of stitches at point of the face to make a nose. When you think the nose is done, hold on...leave the thread and needle hanging and go to the next step!
Step 13: Make one big stitch coming down from the nose to create the look of a mouth. Come up with the needle where you want the eye to go. Make a few stitches in a knot to create an eye, then poke needle through to the other side to make the other eye. Now you’re done with the black thread for this bear’s face!
How many teddy bears do you want to make? Adjust sizes for different teddy bear family members. The final ingredient for each bear is…you guessed it, snuggles! POOF! Teddy bear magic!
Share your own creations with everyone using #UnlockImagination

